Heatmiser uk ltd units 1 5 shadsworth business park mercer way blackburn lancashire bb1 2qu uk tel. On the neostat 12v v2 use the left right keys to select press and hold tick.

Heatmiser Neostat Programming Control And Troubleshooting
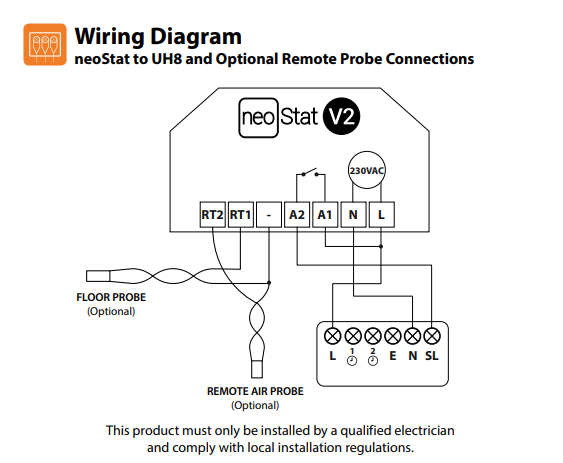
Neostat v2 wiring diagram. Neostat v2 located nearest to the neohub first. To add a neostat v2 follow these steps. You now have two minutes to join the neostat 12v v2 to the neohub. For time clock wiring connections terminate as shown on page 38. Step 4 clip the front of the thermostat onto the back plate securing it in place with the retaining screw. 44 01254 669091 email.
You now have two minutes to join the neostat v2 to the neohub. The heatmiser uh8 n is our central wiring switch box designed to be used with our 12v thermostats. Step 4 clip the front of the thermostat onto the back plate securing it in place with the retaining screw. Heatmiser neostat 12v v2 programmable thermostatwiring diagram neostat to uh1 section header connecting neostat to the uh1 remote 12vdc air sensor the uh1 allows connection of up to eight floor 12 volt neo thermostats. To add a neostat e v2 follow these steps. You now have two minutes to join the neostat e v2 to the neohub.
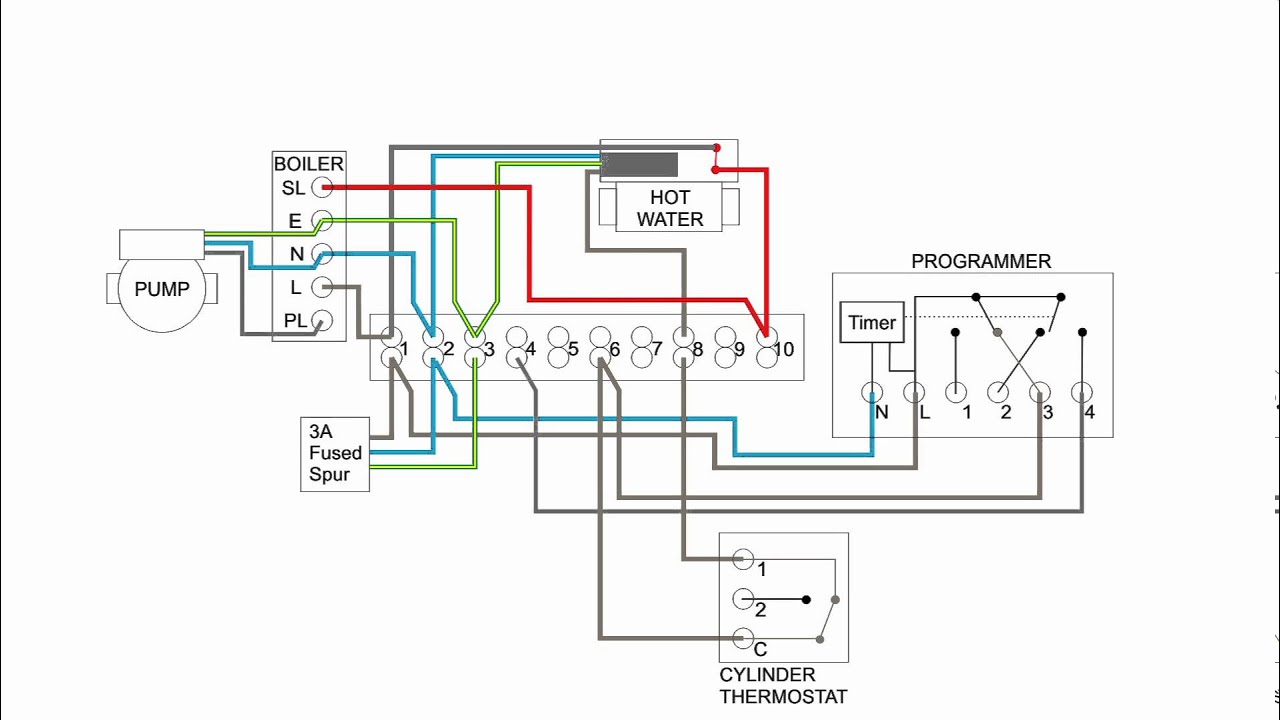
Terminate the thermostat as shown in the diagrams on pages 28 31 of this booklet. 44 01254 669090 fax. Terminate the thermostat as shown in the diagrams on pages 28 31 of this booklet. Wiring diagram neostat hw s plan this product must only be installed by a qualified electrician and comply with local installation regulations. N n l br bl gr or supply to. Wiring diagrams wiring diagram neostat hw s plan timer no nc supply to neostat fused supply hot water valve to neostat hw stat hot water end switch boiler enable this product must only be installed by a qualified electrician and comply with local installation regulations.
For time clock wiring connections terminate as shown on page 38. Heatmiser uk ltd units 1 5 shadsworth business park mercer way blackburn lancashire bb1 2qu uk tel. 44 01254 669090 fax. 44 01254 669091 email. The next step is to join the neostat v2 to the neohub we recommend joining the neostat v2 located nearest to the neohub first. The neostat hw v2 uses proximity to detect when you are about to use the touch keys.
To add a neostat 12v v2 follow these steps. In the app select add neostat enter a preset or custom title then press next. As you approach the neostat hw v2 the touch keys and backlight will light up. In the app select add neostat enter a preset or custom title then press next. The next step is to join the neostat e v2 to the neohub we recommend joining the neostat e v2 located nearest to the neohub first. Step 3 screw the thermostat back plate securely into the back box.
In the app select add neostat enter a preset or custom title then press next. Step 3 screw the thermostat back plate securely into the back box.
Gallery of Neostat V2 Wiring Diagram